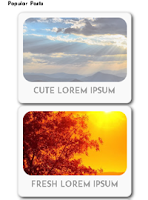
Make Blogger Popular Posts Thumbnails High-Resolution
Blogger thumbnail
images have a default size of 72 x 72 px which is quite small and even if we
use some CSS to make it larger it will not produce the right effect. By using a
simple JavaScript code, we will make the same images larger as well as removing
the blurry details.
In this post we
will make our Popular posts thumbnails bigger. You can also apply this
technique to other Blogger widgets with images.

Applying New Thumbnail Sizes to Popular Posts Widget

1. If Popular Posts widget is not
visible on your blog page, you can activate it in two ways:
Go to Layout > use the scrollbar to search for the Popular Posts tab, it is positioned on the right side usually above or under the page body tab.
Go to Layout > use the scrollbar to search for the Popular Posts tab, it is positioned on the right side usually above or under the page body tab.

Click the pencil icon to configure the
gadget. Check Show Popular Posts and click Save.

In case you can’t find the Popular Posts
tab, click the Add a Gadget link inside your Layout Page.
Use the scrollbar to search for the
Popular Posts gadget and put it in the location you want to show.

2. Click the Theme Menu in your Dashboard
> click the Edit HTML option. Click the mouse anywhere inside your blog code
and press CTRL + F key.
Inside the search field type </b:skin> then press enter.
The tag </b:skin> will appear with
highlighted yellow background.
/* Popular Post Thumbnail*/
.PopularPosts .item-thumbnail a {
height: 130px;
margin: 0 0px 5px;
overflow: hidden;
display: block;
width: 210px;
border-radius: 18px;
}
.PopularPosts .item-thumbnail img {
transition:all .2s linear;
 -o-transition:all .5s linear;
-moz-transition:all .2s linear;
-webkit-transition:all .2s linear;
position: relative;
top: -29px;

}
.PopularPosts .item-thumbnail img:hover{
opacity:.5;
filter:alpha(opacity=60)
}

.PopularPosts .widget-content ul li {
background: #F9F9F9;
border: 2px solid #e8e8e8;
border-radius: 10px;
box-shadow: 0 4px 10px #e8e8e8;
color: #e8e8e8;
padding: 9px;
margin-bottom: 5px;
-webkit-box-shadow: 7px 7px 5px 0px rgba(0,0,0,0.75);
-moz-box-shadow: 7px 7px 5px 0px rgba(0,0,0,0.75);
box-shadow: 7px 7px 5px 0px rgba(0,0,0,0.75);
}
.PopularPosts .item-title {
clear: both
font: 14px Roboto, sans-serif;
color: #0d97db;
font-weight: bold;
text-transform: uppercase;
text-align: center;
}
.PopularPosts .item-snippet {
display: none;
}
.widget .widget-item-control a img {
height: 17px;
width: 17px;
}
/* Popular Post Thumbnail End*/
3. Copy and paste the code CSS Code just above </b:skin> then click Save Theme.

The tag </body> will appear with
highlighted yellow background.
<script type='text/javascript'>
window.setTimeout(function() {
document.body.className = document.body.className.replace('loading', '');
}, 10);
</script>
<script type='text/javascript'>
function changeThumbSize(id,size){
var blogGadget = document.getElementById(id);
var replacement = blogGadget.innerHTML;
blogGadget.innerHTML = replacement.replace(/w72-h72-p-k-no-nu/g,"s"+size+"-c");
var thumbnails = blogGadget.getElementsByTagName("img");
for(var i=0;i<thumbnails.length;i++){
thumbnails[i].width = size;
thumbnails[i].height = size;
}
}
changeThumbSize("PopularPosts1",210);
</script>
5. Copy and paste the JS Code on top of the </body> tag. Then click Save Theme.
To prevent opening a new window when someone click your Popular Posts
photo, search for this line of code in your Edit HTML option:
<div class='item-thumbnail'>
<a expr:href='data:post.href' target='_blank>
Change target='_blank> to target='_self>
Save your theme.
Make Changes to Other Widget with Thumbnail Images
You definitely have widgets that use other blog photos. You can use the JavaScript code to make changes on the image
resolution. You can do that by adding a similar code below:
changeThumbSize("PopularPosts1",210);
Just look for the widget ID, replace the
text below, copy it and paste the code above or under the first syntax.
Example code:
changeThumbSize("Paste widget ID here",210);
Make sure that you select the right CSS
selector. Select class “.”
if the element uses a class. Use “#”
if the element has id tag.
Click Save Theme and check your blog’s
Popular Posts thumbnails.
Comments
Post a Comment